Showing posts with label other crafts. Show all posts

Sunday, February 15, 2015

Using Christmas cards in painting projects.

Well pleased to be writing this blog, illness has been the only thing keeping me from completing this project, back on track pleased to say.
 
Okay, remember the Christmas cards I saved?, well I managed to paint mine with gesso, two coats each side, dry well.
 
 
I chose 7 cards of varied sizes, one large one for the cover this had an embossed heart on the front that I rather liked, it was a little two long so after choosing my other cards for the inside I cut it down slightly. if you have to do this measure it before you attempt cutting, you want it to be nice and straight.
 
The other 6 cards I arranged from largest to smallest, simply because it made it easy to photograph to show you how I put the art book together. You can arrange them anyway you like.
 
make sure that the centre of each card is straight.
 
This shows the bottom edge
 
 
See how the smaller cards are in the middle, some are longer.
 
Top edge,s.
 
Now I made three holes in the folded edge of the smallest card, through all the thickness of the cards. This first one in the middle and then 1 above and 1 below, make sure they are in a straight line and go all the way through all the middle of the other cards, otherwise you will have a crooked book. 


This is the cotton crochet thread that I used to sew the book together. you could use string or embroidery thread as long as it is strong enough to hold together. Measure the cotton 3 times as long as the book this should be enough to use.
 
 
Decide if you would like the string to finish in the middle of the book as I have done (start on the inside)
or finish on the outside to attach beads or charms on. (start on the outside)
 
As my book; thread the needle and starting in the middle of the book sew  the cotton through the centre hole to the outside of the cover, leave a god bit of cotton on the inside. Now thread the cotton through the top hole it should now be back into the middle of the book. Now thread the needle through the bottom hole, (see the photo above) out to the cover.


The last thing is to thread through the middle hole from the outside into the middle of the book, make sure that this end of the thread is on the other side of the middle cotton. Also make sure that this is pulled tight enough to hold the book but not tight enough to tear the cards.


Still with the two ends one each side of the middle cotton, tie twice again make sure that this is not loose, the pages should not move around, cut the cotton as shown above.
 
If you wanted the long ends to add beads make sure you start on the outside, still tie a double knot, but leave the long strings to dangle so you can decorate later.


This is the finished book. I will be decorating this later using acrylics and maybe some Folk Art designs. I will let you know how I go and share some pages with you.

You may use any colour on your backgrounds depending on what you wish to paint in your book or you may wish to use mixed media, collage, scrapbook or journaling!
If you keep to a simple colour scheme all the pages will complement each other especially if you have used different size cards as I have used. Hope you have Fun.


Friday, September 5, 2014

Little bright book

This week I have not been too well again, dizzy and sinus on top of yet another virus. So glad when I get over this virus.

Anyhow still found some time to do a little bit with Inktence blocks, not much else I can do at the moment.

Taking an A4 sheet and decorating it as last time, with different colours I them made a little art book to carry around while away, (when we get better). Each book has 14 pages to decorate, I gave them all the same treatment for the background as it would be easier to decorate or journal while away.
These I posted on my MadeIt site for sale. They have a button on the front with a painted cord, hand made beads, the front and back cover are decorated and have a sealer to protect them. On the inside they have the same coloured background as the front.


As with the page I showed in the last post you can decorate however you like, I used paint, pen and glitter to decorate, its your choice.

I have some planned that have plain pages in the middle to do your own thing, these will be for sale later.

Please remember that these painted designs are affected by copy write and can not be copied, changed, resold.

However, I encourage you to have a go at making your own art journal for personal use, there are plenty of opportunities to follow someone on YouTube in how to make art journals.


Saturday, August 30, 2014

Using Inktence blocks and Matisse paints.

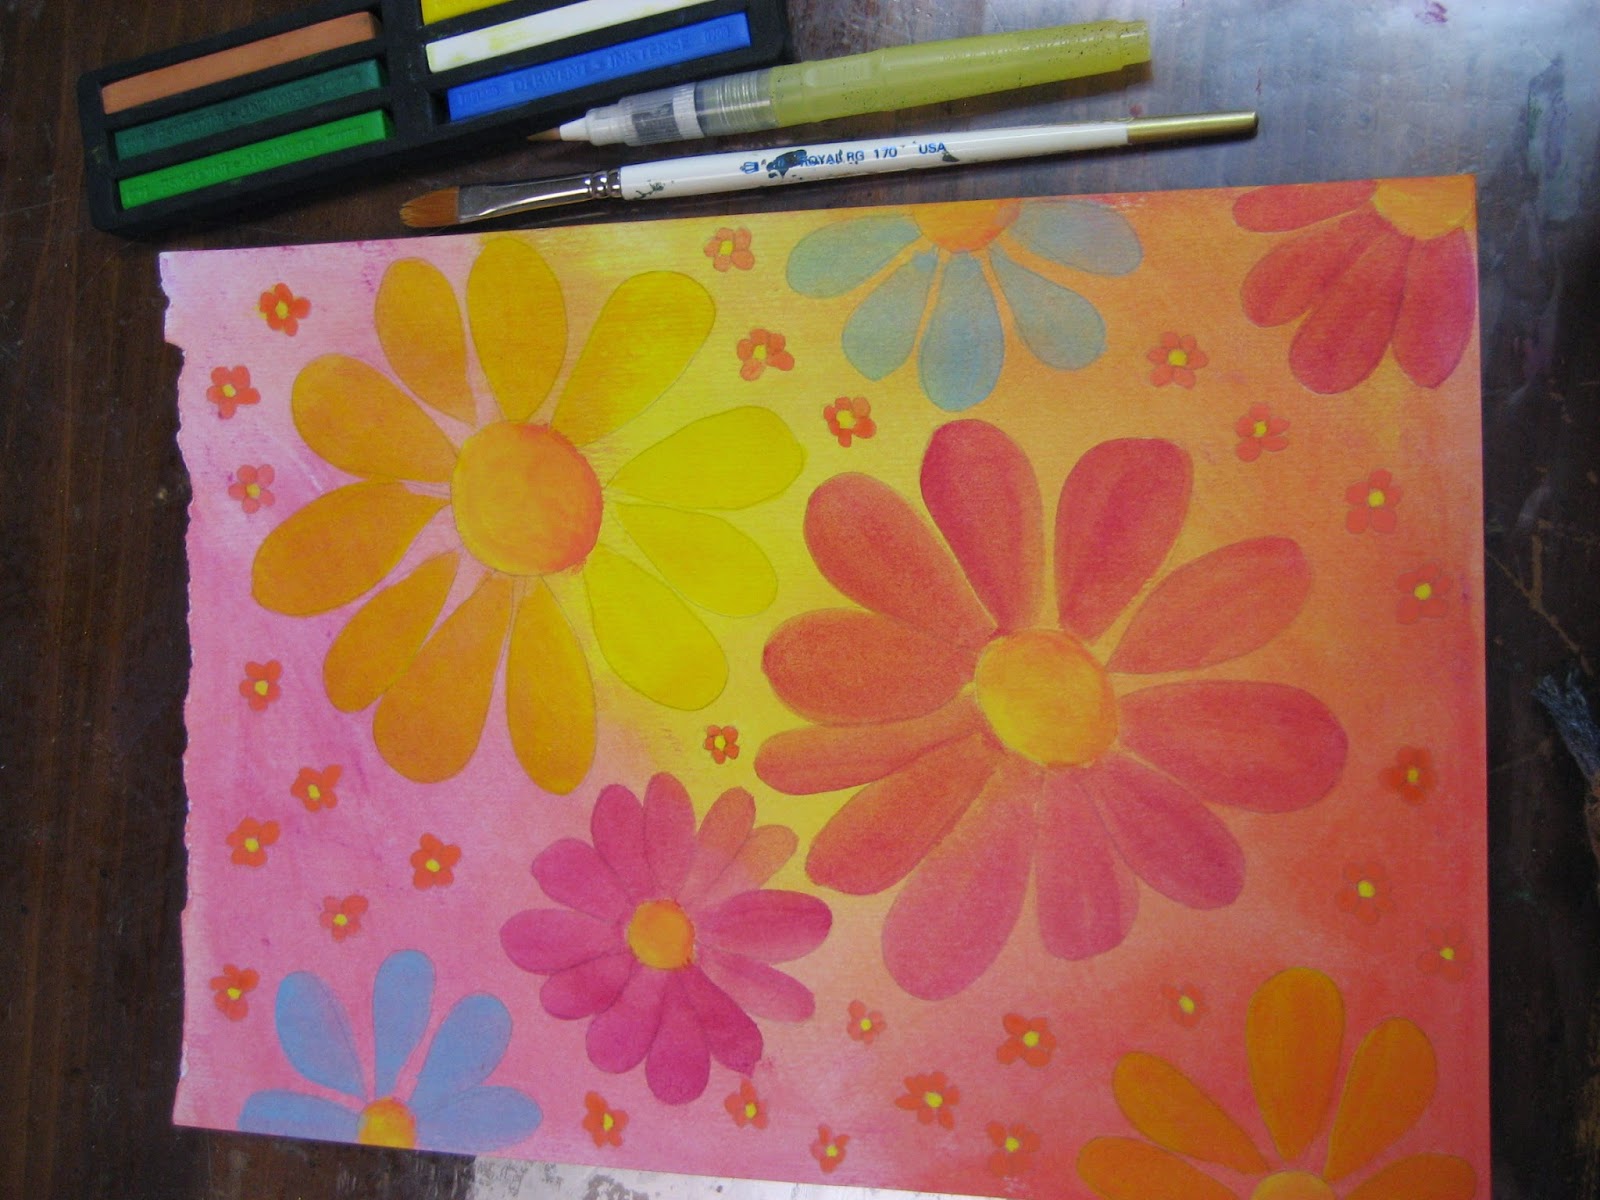
Just finished this project using Inktence blocks (these are like the Inktence water colour pencils) and some Matisse paint. You can also see in the photo a water brush and a filbert brush.

I first used 3 colours from my few Inktence blocks and rubbed them across the dry A4 watercolour page, placing the colours where i  wanted them, covering all the paper. Next i took a baby wipe and starting with the lighter colour first i wiped the colour over, blending in the colours with a circular motion. Do not rub too hard or you will rub off all the colour.  When i was happy with the result i let it dry naturally. Then i lightly drew on the flowers with a pencil.

Please note that the pencil lines can not be rubbed out very well.


Next I used a filbert brush and using watery Matisse paints i painted in the large flowers. The small flowers were painted by using the water brush and the Inktence blocks.

The water brush is a brush with a water chamber and works well with watercolours, the brush reminds me of the old fashioned ink pens!

Again dry well.


Next i added some black outlines to make the flowers pop.


 Using a white pigment pen, (bought from Officeworks) I dotted all over the background. This pen is also good for writing over your art journal.


Next I added some stickles, by Ranger, it has a very thin funnel and makes applying it much easier. Matisse make a good range too.

                                                     
                                                          This is the finished piece; Just have fun, Lyn.


Wednesday, February 12, 2014

New Art book

Hi again, welcome into 2014. I have been slow starting this anything new this year, just recovering from a pulled ligament in my leg, which stopped me from sitting for even the shortist of time, on the mend now.

I attended a workshop on Saturday with the Mountains and Rivers, the First meeting of the year. Click to see more. www.mountainsandriversfdp.blogspot.com

We painted a watercolour and Incorporated salt into the design, Janette Newman was our teacher for the afternoon, an enjoyable project.

Today I was able to sit for a while and I played with some colour and salt making an interesting  background onto watercolour paper. I then drew some simple flowers onto the background and started to paint them. Not finished as I was interrupted, I will add a photo of the finished project when complete.


At the beginning of this month I started to paint into my art book, a hard covered multy media page book, it has an elastic band to close. the size is A5, or A4 over 2 pages. I wanted to use this book for my original paintings or pre-designs and ideas. So I started to paint in some of my older designs that I have painted in the past, a good start, so now my leg is getting better I can resume this interest.


Nothing special about this book, I bought it from Office Works. I painted the first double page with white Gesso, Painted on my Owls design. As I started to paint the corners curled, so when I had finished and it was  all dry I glued two pages together, not a good idea, too thick, I recon if I just painted Gesso on the back of the page it would have been okay. Only thing I also glued the next two pages together at the same time,  so my first two paintings are very thick.
Next I decided I needed to bring out the colours on the page so I painted Jo Sonja All purpose Medium over the pages, it came out with too much shine and sticky, when this had dried well I decided to spray a matt varnish over it to see if it would work, well it worked!!! Took away the shine and now it was not sticky at all.

(The bubbles you see on the left of this painting is where I glued the pages together, not a good idea).

My next painting was my Pelican that I painted for Mountains and Rivers Convention a couple of years ago, this I also added a journal page, this is not yet finished, I will add a completed photo when it is complete.


The next entry is about the shells I added to the original Pelican painting.


Have fun starting your own book or just have fun with your painting. If you would like ideas about starting a Journal or smash book look on the internet, there are plenty of free video's on the net to get you started.

As I add to this book or paint more pieces I will post them on this blog, Happy New Year to all, Lyn.


Tuesday, October 22, 2013

Smash Art Book

As promised I am now showing some of my pages from my Smash Art book. I have been working in this book in between my Folk art Painting. I find it more creative as I paint what I feel, and it also gives me samples and ideas to look back on. Sometime a simple idea can lead to a folk art design.

Smash books are a way for everyone, even if you have no experience in this type of craft or art, you can still use it to express how you are feeling at the time, it does not have to be painted, craft items are often included into smash books. Some books or pages can be very personal to the person creating them and may never be shown, a form of therapy, If you use acid free products you could also use it as a photo album or journal,  there are plenty of other examples of how to video's on the internet to help you get started.


I started with a basic art book from the local VH dollar shop, cost was $5.50. Taking a piece of watercolour paper (140g) slightly smaller than the front cover, (which is plastic by the way). I taped down the paper to a board while I worked on the pattern. Using a permanent black texture pen (also from the dollar shop) I drew in the horizontal wavy  lines and did a bit of doodling between them, the bottom half I used a stencil and drew through the holes in the stencil, moving it around as I worked. Then I coloured it with water colours, let it dry and glued it to the plastic cover with PVA glue. Make sure that the edges are stuck down.

These two postcards are from a lady  I bought a purse from on Etsy, Bo, sent me these as a little surprise in my parcel. I was not sure what to do with them, as I really liked them I decided to add them to my smash book, with a bit of watercolour, doodling and some writing, it did not need anything else. This is where it can start to get personal and I like the way it is proceeding, either arty or as a visual diary. Smash books are about layering, but I like things more simple, cleaner looking, I enjoy that. How you journal is up to you!

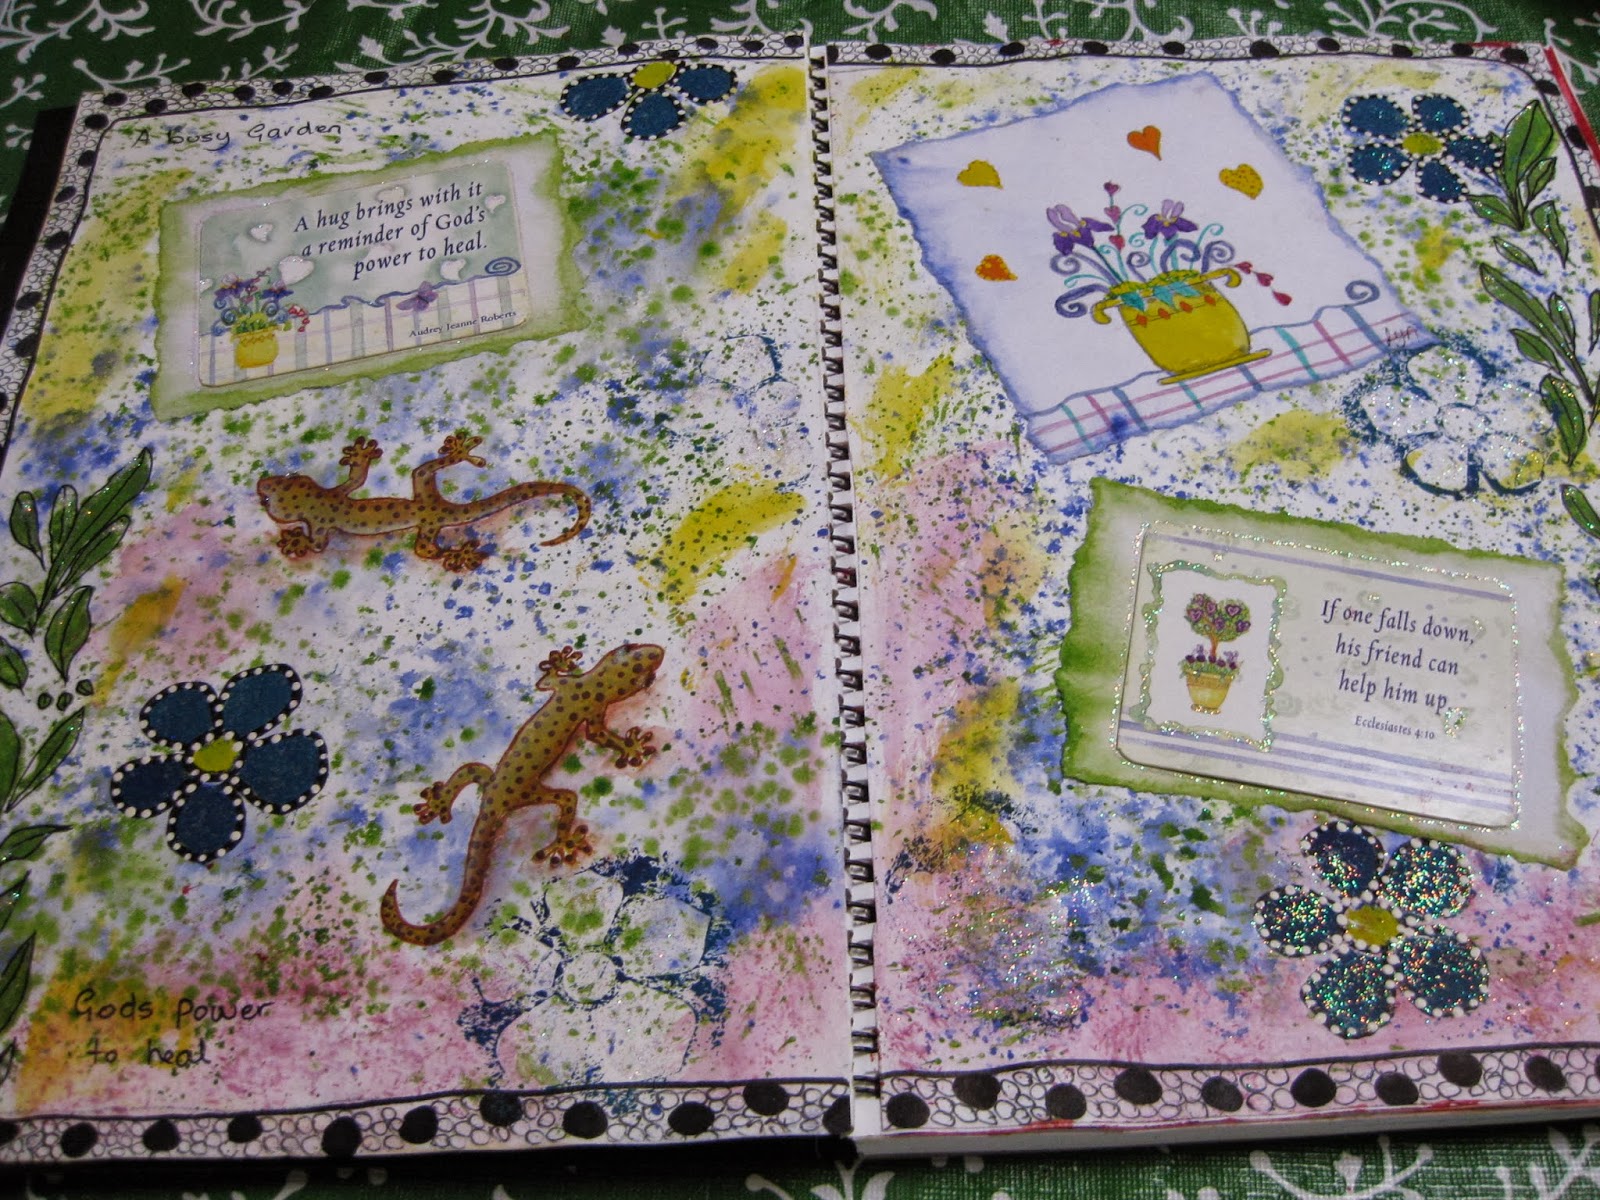
This one is more about layering, as full as a garden can get, it was inspired by the two spiritual cards, I had for ages, with a little bit of layering using stamps, splattering, stenciling and some painting this page emerged. 


Work is ongoing and I intend to keep going with this type of work as well as with Folk Art.
Next Sunday I am attending a workshop with the Mountains and Rivers, looking forward to that and I have a teacher that I have not worked with before so it should be fun! Photo's later. Enjoy!


Friday, May 31, 2013

Latest painting, Mixed media.

Hi Everyone!

Had nearly a week to get over my weekend away at Nelson Bay with the ladies from Mountains and Rivers. Great weekend, the painting was A1 as usual, for the first time at this convention I taught a class, my Owls were one of the painting choices on the Friday afternoon, it went well with seven students, we seemed to be laughing a lot I was told by the other classes, we did have a good time all weekend.

Saturday I chose a mixed media painting by Josephine Louwen, Josephine is one of our Mountains and Rivers Folk Art teachers, an excellent teacher with many years experience.


This "Zentangle" is painted by me from a design by Josephine Louwen.

Josephine can be contacted through Mountains and Rivers.


Since painting this I have looked into the pen work on the circle. Some call it "Zentangle" others doodling. Doodling - meaning is; Doodling - present participle of doo-dle (verb) = 1.    Scribble absentmindedly.

If you Google search ' doodle you find that the work is often drawn absentmindedly with no real form, often filling the page. 

While searching "Zentangle" they start by drawing what they call a 'string' and forming a shape with this drawn 'string they then draw a selection of patterns inside this 'string'

"Zentangle" is a trade mark of an internet company that sell books and patterns.

In the last couple of days I have trying out some dooling/tangling (what ever you would like to call it) of my own, it is quite easy to do, and it grows on you!


This one I drew around the bottom of a Horlicks container, it was oval. I then drew shapes inside the oval and decorated them, I then went outside the oval and drew some more shapes until I was happy with the design. When I looked back I can see a bird with it's head tucked away, I had no intention of drawing anything, just a as my mind took me. Not bad for a first attempt.


This second one I was tired so the shapes not so good, I was trying to resemble the comers in Folk Art, just goes to show it is best not to think too much when drawing these, it is best left quite spontaneous.

I drew this one the next night, must have had too much chicken! that is what it reminds me of!

These by the way were drawn on lined paper out of an exercise book with a double sided "sharpie" pen. The trouble I had is that the pen bleed through to the next page, so either put a piece of card under the page or better still draw on a sketch book or some thicker paper. Look out for some mixed media paintings using some tangles within the painting. Do try it and Have fun!

Sunday, April 14, 2013

Inktence Pencils.

More of my bookmarks, these are very easy to make and very relaxing. I drew the first designs on some paper , I found them easy to draw so instead of transferring them onto the bookmarks I drew the design straight onto the card stock using the outliner provided  in the set. The card stock I purchased ready cut out from www.creativecrafts.com.au

They would work on any card stock. Start with the daisy, they are very easy.

Next I used Derwent Inktence pencils. I had bought them ages ago at a craft show and have not used them until now, my intention being that they would be good to carry while on holiday and I could use them to make colour sketches, this of course never happened, but now I know how to use them I quite enjoy the light change and freedom they give you. The pencils would be good for smash books and journals. you can also buy them in stick form, like the pastels.

Method;
First I sprayed the cards with ink, red and purple, wait a few Minuit's and glue the cards together, this gives you added strength for bookmarks. When dry, draw or trace the design onto the card stock.

Then I started to colour in the flowers with the Inktence colour pencil, now with a small watercolour paintbrush, dip this in water and start to paint one area at a time. The water will blend the colour making it a more intense colour. It dries in a few seconds, once dry you can add more pencil and repeat with the water. I have found more information on the net and the following guidelines gives you more idea of how they work. you can also find out more about them on YouTube. Go onto YouTube and type in Inktence pencils.

The outliner will rub out with an eraser. It is also waterproof.
use two or more colour pencils dry to your work, when a small amount of water is used you can blend together these colours.
If you draw onto a wet area with your inktence pencil it will stay there, you will not be able to blend together.
If you want to blend colours or darken colours, say on one petal, add the paler colour first, add water, dry then add the deeper colour, add water to deepen.
Hope this makes sense?
Happy Painting. Lyn.

To explain this try reading this;
http://robertsloan2.hubpages.com/hub/Secrets-for-Using-Derwent-Inktense-Colored-Pencils

Saturday, April 6, 2013

Hand painted bookmarks

Today I set aside time to paint some bookmarks that I had purchase long ago.........

I sprayed the bookmark/cards with Smooch Spritz, made in USA. I have had these for ages and I am not sure if you can still get them, they are lovely colours. They do not fade and do not smudge when wet. I would love to get some more as I am running out but can not find them at craft shows. So if anyone knows where I can get them from please let me know.

Back to the bookmarks, I then drew on some flowers and wild flowers, using the Inktence pencils by Derwent I painted the design, took me nearly all day (on and off) to paint 6 bookmarks. Well worth the effort as I am pleased with the results. Happy painting!
All these bookmarks are for sale on madeit.com.au/artbylyn

Tuesday, October 30, 2012

Count down to Christmas

After hording this Advent Calender kit for over a year (bought at Spotlight in a sale after two Christmas's ago), I decided to decorate it for my two youngest grandchildren, now aged  3 years, and 17 months. Each drawers is big enough to hold two chocolates.


The whole box comes as a flat pack, trouble? set with papers and glue I started to make up the boxes, 24 in all. I made a template out of the flat box, cut out 24 lining papers, scored and glued the lining onto each inside of the boxes. Good so far!

I then made a smaller template for the bottom of each box, cut out the 24 bottoms with enough paper on each side to go partly up the box. I then glued the boxes together, first problem as the boxes were made of cardboard the first layer of cardboard kept coming away as I glued the box together, so glad I decided to cover all the box as it has made them stronger.
When these were dry (and make sure that they are square otherwise they will not fit the holes) I glued the bottom papers onto each base. placed glue on each of the 4 (shorter) sides and glued them down.

Next I measured around one box and the depth plus a little for the overlap and cut out 24 strips of patterned paper, glued each strip to the outside of each box overlapping slightly at the back.
When they were dry I used a sharp craft knife to cut around each finger hole. a lot of work but now they are stronger and not falling apart.

Now the box, the flat pack needs cutting apart as the walls are joined together, you also need to trim the nodules so they fit flush with the back when glued in place. I tried a craft knife, but nearly broke the blade, so arm yourself with a Stanley knife, but please be carefull! Once apart you can sand them, but being MDF it is not good to sand before painting.
The back and outer walls I painted with Jo Sonja-Poppy. I then covered all the inside walls of the box, and all the little dividers  with papers, using a craft knife to trim any areas that needed a trim when the paper was dry. Any areas that were to be glued together I did not cover with paper.

Gluing the box together with PVA wood glue for strength. Please take great care that all the walls are square, and the dividers have enough even space between them to hold a box.  I had to use 3 hand  vices to help do this job, and I used spare paper to put under the vices so that it would not tear the paper. Also the paper on the walls has to be dry.
The papers I bought from Spotlight, a set of matching 12 x 12 papers in a pad for $10 (VIP price) including the  paper I used in the middle. Spotlight was the only store with Christmas paper, and choice was limited.

I have left the center with nothing in it as my Daughter can add her own ornament's as she wishes. The numbers I looked all over for, Spotlight, Lincraft, two dollar shops and they had nothing like I wanted, I came home, looked through a stash that my Mum had and found just what I needed. I glued a large sequin onto each box and then added the numbers, to finish I added a small puffy glue on, stocking, candy cane or holly. All in all it took me over a week to finish! was it worth it?  
YES for my Grandchildren. Would I do it again? No!


Saturday, October 13, 2012

Have been busy..........

Hi all, it is a long time since I posted something on my blog, well this nasty flu bug is still giving me problems, still on the sprays, like so many other people that I have spoken to, and with the CFS/ME it just brings on the symptoms of Fatigue. Rest, rest and more rest.

I have not done much painting for the last few months, however, I have finished off the painting I did with Christine Whipper, it still has to have some varnish and a hanger on it, looking good! I have to take a photo of it in the next couple of days to show you.

Also from a couple of years ago I bought a Advent Calender kit, it has sat in the spare room for all this time, now my grandchildren are growing up I have started to decorate it with papers left over from my scrap booking days. I must say it was a lot easier cutting and gluing the papers than painting all those pieces, as well as the problems of painting them only to find that the craft wood has swelled when painted so lots of sanding would have been needed.
The craft wood covered quite smoothly with the paper, it looks good too. When it is completely finished I will post the photo and how I covered it. Worth the effort for my Grandchildren and I enjoyed the process, just that it took so long as everything was flat packed, and no real instructions! Not something I would do again in a hurry.

I have also been helping a friend paint two very heavy (but sturdy) old posters she has in her kitchen. They are looking good with a fresh coat of paint and a different look, we spent a few hours yesterday working on one of them with much improvement. Too big and heavy to bring to class so we are painting them on site.
Be back soon with photo's of all projects, Lyn.

Wednesday, June 27, 2012

Crochet and Painting

Hear we are nearly in July, hard to belive it is a month since we came back from convention! Time has passed quickly, I have had yet another virus, not so good and with having chronic fatigue syndrome it lasts longer and very hard to get rid of. Still had plenty of rest and many ideas for painting, all I have to do now is find the energy to catch up on my painting.

Just before convention I spent some evenings crocheting fingerless gloves and scarfs. My fingerless gloves are great for cold days while working with your fingers free.  My scarfs are not the usual long scarfs that you find everywhere, but short fancy scarfs that are warm and soft to wear and at the same time are not as bulky as normal scarfs.

My scarfs are my own design,  I look at the wool, how much yarn I have bought and decide how I am going to crochet it. I never crochet two pieces alike. The flower clasp is also of my design and will fit any scarf. I use new wool in every project. Please do not copy my designs, if you email me I will gladly send you the pattern for any one.

 This Aqua scarf is long enough to wrap around the neck and fasten with a little flower clasp. keeps the neck warm while still being fashionable. Made from 100% wool.
This Blue/purple scarf is crochet in 100% wool too, Longer and wider  than the one above, worn over the lower necklines of today it will keep you warmer while still being soft and lightweight to wear.


Another style, this cerise colour scarf is shown doubled over. It can be worn like this or opened out for a wider scarf, it also has a flower clasp to keep it in the postion. Also made from 100% wool, soft and warm to wear.


As winter slowly comes to an end I have to put away my crochet hooks and back to my painting again, it has been some months since I have painted, the longest I have not had a paint brush in my hand.

The next few weeks I will be back with more painting as I prepare a few projects for the Mountains and Rivers 'No Frills' weekend away in October. Only one project will be chosen. I have been asked to teach a class at this weekend away, while this being scary and excited at the same time I have a few ideas to put onto canvas ready for this event!

So look out for more painting news soon, thankyou for reading my blog, seems that people from all over the world are reading this, it is quite popular, who would have thought that. I would love to hear from some of you, or even as a follower, I promise that I will not send 'spam' your way, I am just interested in my readers, Thanks! Lyn.


Monday, May 21, 2012

 I have been making these fingerless gloves for a a while now,
They are made 100% Australian wool, using either a plain or decorative stitch, with a nice ribbed effect around the wrist.  I have added an extra finnish on the edge so they fit snugly around the hand, along with small flowers or butterflies.


Saturday, June 18, 2011

Crochet for winter

During the cold winter nights I thought I would start crochet again, I have not done this for years since my kids were small and my sister in law had a baby shop in Mexbrough (UK) where I used to crochet mattinee jackets for her shop. As with other crafts it fell out of fashion for a few years, now as I have grandchildren it has once again come back into fashion, so out came my hooks again and my fingers working fast I made some scarfes and fingerless gloves for myself and some friends.