Showing posts with label easy patterns. Show all posts

Saturday, August 30, 2014

Using Inktence blocks and Matisse paints.

Just finished this project using Inktence blocks (these are like the Inktence water colour pencils) and some Matisse paint. You can also see in the photo a water brush and a filbert brush.

I first used 3 colours from my few Inktence blocks and rubbed them across the dry A4 watercolour page, placing the colours where i  wanted them, covering all the paper. Next i took a baby wipe and starting with the lighter colour first i wiped the colour over, blending in the colours with a circular motion. Do not rub too hard or you will rub off all the colour.  When i was happy with the result i let it dry naturally. Then i lightly drew on the flowers with a pencil.

Please note that the pencil lines can not be rubbed out very well.


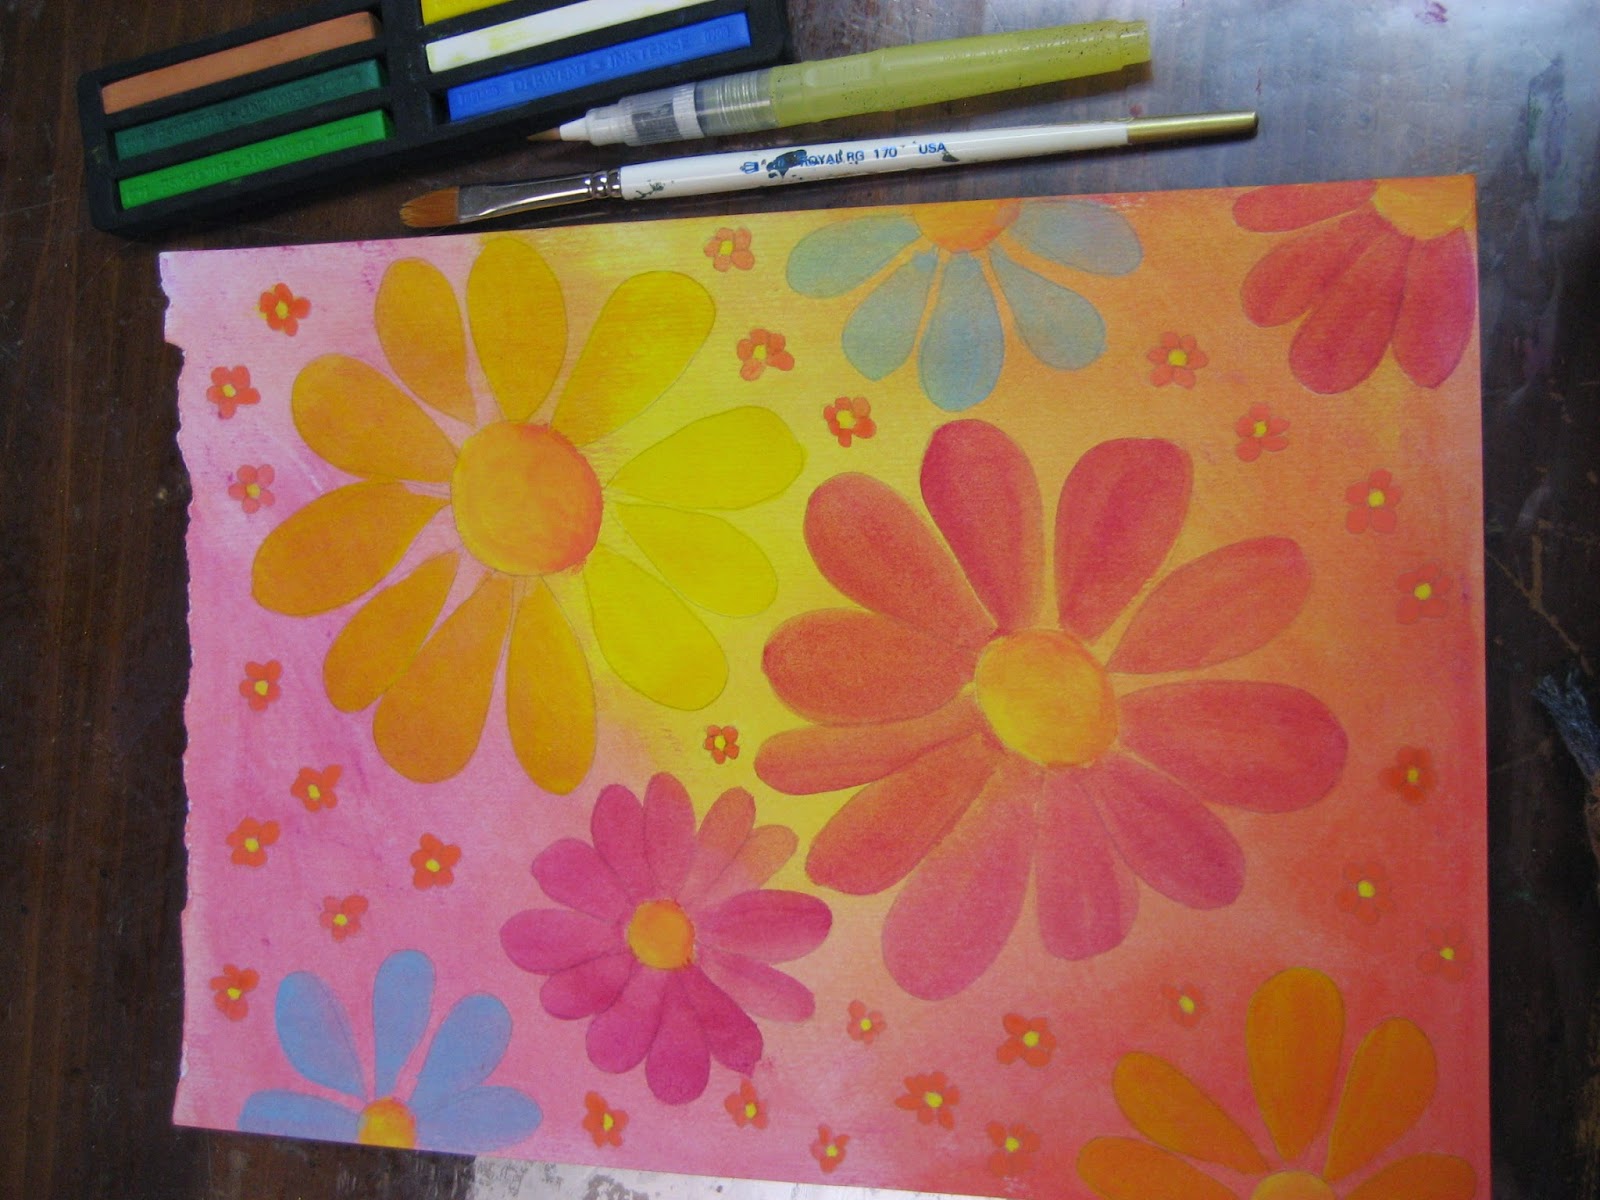
Next I used a filbert brush and using watery Matisse paints i painted in the large flowers. The small flowers were painted by using the water brush and the Inktence blocks.

The water brush is a brush with a water chamber and works well with watercolours, the brush reminds me of the old fashioned ink pens!

Again dry well.


Next i added some black outlines to make the flowers pop.


 Using a white pigment pen, (bought from Officeworks) I dotted all over the background. This pen is also good for writing over your art journal.


Next I added some stickles, by Ranger, it has a very thin funnel and makes applying it much easier. Matisse make a good range too.

                                                     
                                                          This is the finished piece; Just have fun, Lyn.


Monday, November 18, 2013

Tis the season, well not quite...........

Tis the season to be gathering all those un-finished, un-painted Christmas projects ready to put on display in a couple of weeks time.

Among my little treasures I found some cut out Santa,s on of my students cut out for the class a long time ago. They are rocking santa's, that is they stand up and if you pull them to one side, gently, they will rock from side to side for a few moves, without falling over.

I painted 7 of these little fella's, all in red, it was not until I had finished that I thought i could have painted some of these in brighter colours, they look good all the same. if you are interested they are for sale on my Made it store or Etsy store, links to both sites are on the right hand side of this post.

As we do not have the resources to have more of these little Santa cut out, these are the last I have.

The original Design is from; an American book called; Country Lovin, warm 'N Cozy, by Pat McClure. It  was published in 1990, by Viking Folk Art.


Me pulling  Santa to one side ready to make him rock.
This one is the small size, there are two larger one's.
A close up of one of the faces.


Friday, May 31, 2013

Latest painting, Mixed media.

Hi Everyone!

Had nearly a week to get over my weekend away at Nelson Bay with the ladies from Mountains and Rivers. Great weekend, the painting was A1 as usual, for the first time at this convention I taught a class, my Owls were one of the painting choices on the Friday afternoon, it went well with seven students, we seemed to be laughing a lot I was told by the other classes, we did have a good time all weekend.

Saturday I chose a mixed media painting by Josephine Louwen, Josephine is one of our Mountains and Rivers Folk Art teachers, an excellent teacher with many years experience.


This "Zentangle" is painted by me from a design by Josephine Louwen.

Josephine can be contacted through Mountains and Rivers.


Since painting this I have looked into the pen work on the circle. Some call it "Zentangle" others doodling. Doodling - meaning is; Doodling - present participle of doo-dle (verb) = 1.    Scribble absentmindedly.

If you Google search ' doodle you find that the work is often drawn absentmindedly with no real form, often filling the page. 

While searching "Zentangle" they start by drawing what they call a 'string' and forming a shape with this drawn 'string they then draw a selection of patterns inside this 'string'

"Zentangle" is a trade mark of an internet company that sell books and patterns.

In the last couple of days I have trying out some dooling/tangling (what ever you would like to call it) of my own, it is quite easy to do, and it grows on you!


This one I drew around the bottom of a Horlicks container, it was oval. I then drew shapes inside the oval and decorated them, I then went outside the oval and drew some more shapes until I was happy with the design. When I looked back I can see a bird with it's head tucked away, I had no intention of drawing anything, just a as my mind took me. Not bad for a first attempt.


This second one I was tired so the shapes not so good, I was trying to resemble the comers in Folk Art, just goes to show it is best not to think too much when drawing these, it is best left quite spontaneous.

I drew this one the next night, must have had too much chicken! that is what it reminds me of!

These by the way were drawn on lined paper out of an exercise book with a double sided "sharpie" pen. The trouble I had is that the pen bleed through to the next page, so either put a piece of card under the page or better still draw on a sketch book or some thicker paper. Look out for some mixed media paintings using some tangles within the painting. Do try it and Have fun!

Sunday, April 14, 2013

Inktence Pencils.

More of my bookmarks, these are very easy to make and very relaxing. I drew the first designs on some paper , I found them easy to draw so instead of transferring them onto the bookmarks I drew the design straight onto the card stock using the outliner provided  in the set. The card stock I purchased ready cut out from www.creativecrafts.com.au

They would work on any card stock. Start with the daisy, they are very easy.

Next I used Derwent Inktence pencils. I had bought them ages ago at a craft show and have not used them until now, my intention being that they would be good to carry while on holiday and I could use them to make colour sketches, this of course never happened, but now I know how to use them I quite enjoy the light change and freedom they give you. The pencils would be good for smash books and journals. you can also buy them in stick form, like the pastels.

Method;
First I sprayed the cards with ink, red and purple, wait a few Minuit's and glue the cards together, this gives you added strength for bookmarks. When dry, draw or trace the design onto the card stock.

Then I started to colour in the flowers with the Inktence colour pencil, now with a small watercolour paintbrush, dip this in water and start to paint one area at a time. The water will blend the colour making it a more intense colour. It dries in a few seconds, once dry you can add more pencil and repeat with the water. I have found more information on the net and the following guidelines gives you more idea of how they work. you can also find out more about them on YouTube. Go onto YouTube and type in Inktence pencils.

The outliner will rub out with an eraser. It is also waterproof.
use two or more colour pencils dry to your work, when a small amount of water is used you can blend together these colours.
If you draw onto a wet area with your inktence pencil it will stay there, you will not be able to blend together.
If you want to blend colours or darken colours, say on one petal, add the paler colour first, add water, dry then add the deeper colour, add water to deepen.
Hope this makes sense?
Happy Painting. Lyn.

To explain this try reading this;
http://robertsloan2.hubpages.com/hub/Secrets-for-Using-Derwent-Inktense-Colored-Pencils

Sunday, March 4, 2012

Baby Lama


I have just finished painting this Baby Lama. Painted from a photo I took at the Royal Easter Show some years ago.

Easy to paint and I enjoyed it very much!

For a free pattern, please email me and I will send it to you!

Monday, September 12, 2011

Painting Paper Mache


 Some of our ladies painted oval paper mache boxes with a design from the book 'An Old Fashioned Garden, Volume 6 by Peggy Nuttall.

The box was very deep so we repeted the design on the base, it would also look nice with the top of the box painted with flowers. Some flowers are also in the same book.


The book uses water mixable oils, The boxes we decorated are painted with Jo Sonja paints.


                                               This one was painted with grass and a flower garden on the deep base instead of repeating the design, they both looked nice.

Painting on Glass

Painting on glass with simple daisy pattern. Make sure that the glass is super clean, I wash them in the dishwasher.

Cut the pattern out and place inside the glass or bowl, tape in position, you can add some tissue paper inside to keep the paper close to the glass.


Use Jo Sonja Glass and Tile Medium Part B to mix 1/1 with Jo Sonja colours and paint on design in thin coats, layering untill you have the depth of colour you like. Dry well between coats.

Dry well, a hairdryer can be used but with caution! not too hot or for long time, wine glasses are best left to dry naturally.
When dry paint over the design with the Tile Medium Part B, dry well.
Can be hand washed but not in the dishwasher. Care should be taken when washing so the design will not be damaged.

Monday, August 2, 2010

Begginers choice


This piece of craftwood is from Key industries, cost $3.40c. It is 35cm wide. It has a routed edge.
I adapted and painted this design to fit the wood. It would make a really good beginers piece as the liner work would be good practice.


The craftwood is painted with Jo Sonja, Harbour blue background colour, I used a Jo Sonja sky blue background colour as a wash over the base and with cling wrap I smudged it around a little, carefully taking off the cling wrap.
A few mistakes, the pattern looks flat at the top, by adding another flower faceing outwards would greatly improve the pattern. Also the ears on the possum look like they come from the eyes, (this I did not see untill I took the photo). Simply add some more grey fur just above the eyes.


The original pattern is by Judi Beggs, found in an old The Art of Folk Art, book, Volume 32.
This next pattern is also found in the same book.


Another great beginners piece, plenty of commers to practice!
Painted on the same size craftwood cut out, this time painted with Jo-Sonja Mustard Seed. This pattern was very small so I enlarged it and then repeted the middle part three times and changed a few buds.

Ladies and gents,
Have Fun,
Learn to Paint!

Sunday, March 28, 2010

Painted pieces this week

Not a great photo of this lovely painting. This project, Kakado, published in the Fine Art & Decorative Painting, Vol 17-No 3 Looks great painted. Mattisse paints are used and it is really a good lesson in background painting with blending and glazing colours.

A challenge, but a very enjoyable painting.


Easy to paint Orchids, as featured in the Folk & Decorative Painting, Vol 12-No 8.

Some students have painted this project at home without any help, instructions are very good.

I bought this frame from the local second hand shop, has a pine frame that I painted with Naples yellow hue & Gold pen.