Showing posts with label Things of interest. Show all posts

Friday, February 20, 2015

Adding colour to the pages. Used cards 2015.

Painting two of the inside card surface. I left the inside of the front cover and worked on the next two pages.
 
I took some of the Matisse Flow, in Cerulean Blue and Aqua green light on the left page, I did not use much water just enough to dampen my brush. I then used a baby wipe and pounced some more of these two colours to blend.
 
The right hand said page I used Matisse Flow, in  Cadmin Orange Deep and Iso Yellow, again blending with a baby wipe to blend and add interest to the page.
 
Adding Interest to the background;
 
Next I placed my stencil onto the background and holding it with my left hand I used a baby wipe to pull out some of the colour, do this gently as too much you will show the white gesso underneath, which is not quite what I was after. It is okay if you like to see the white, it is your painting.
 
Here you see how light I was with the baby wipe,
the background was almost dry when I did this part.
 
This part was wiped out while the paint was just touch dry,
see how deeper the colour has moved, almost white.


Of course either one is okay, it is simply a matter of choice. You may also use any stencil you like, this one I have had a long time and not sure where I got it from.


I am going to paint all my pages with Matisse Flow and maybe some stencil techniques before I start painting the designs on the page's. Remember to use colours that match or complement the colour pallet you choose. I will show my pages again when I have painted them all. 

Sunday, February 15, 2015

Using Christmas cards in painting projects.

Well pleased to be writing this blog, illness has been the only thing keeping me from completing this project, back on track pleased to say.
 
Okay, remember the Christmas cards I saved?, well I managed to paint mine with gesso, two coats each side, dry well.
 
 
I chose 7 cards of varied sizes, one large one for the cover this had an embossed heart on the front that I rather liked, it was a little two long so after choosing my other cards for the inside I cut it down slightly. if you have to do this measure it before you attempt cutting, you want it to be nice and straight.
 
The other 6 cards I arranged from largest to smallest, simply because it made it easy to photograph to show you how I put the art book together. You can arrange them anyway you like.
 
make sure that the centre of each card is straight.
 
This shows the bottom edge
 
 
See how the smaller cards are in the middle, some are longer.
 
Top edge,s.
 
Now I made three holes in the folded edge of the smallest card, through all the thickness of the cards. This first one in the middle and then 1 above and 1 below, make sure they are in a straight line and go all the way through all the middle of the other cards, otherwise you will have a crooked book. 


This is the cotton crochet thread that I used to sew the book together. you could use string or embroidery thread as long as it is strong enough to hold together. Measure the cotton 3 times as long as the book this should be enough to use.
 
 
Decide if you would like the string to finish in the middle of the book as I have done (start on the inside)
or finish on the outside to attach beads or charms on. (start on the outside)
 
As my book; thread the needle and starting in the middle of the book sew  the cotton through the centre hole to the outside of the cover, leave a god bit of cotton on the inside. Now thread the cotton through the top hole it should now be back into the middle of the book. Now thread the needle through the bottom hole, (see the photo above) out to the cover.


The last thing is to thread through the middle hole from the outside into the middle of the book, make sure that this end of the thread is on the other side of the middle cotton. Also make sure that this is pulled tight enough to hold the book but not tight enough to tear the cards.


Still with the two ends one each side of the middle cotton, tie twice again make sure that this is not loose, the pages should not move around, cut the cotton as shown above.
 
If you wanted the long ends to add beads make sure you start on the outside, still tie a double knot, but leave the long strings to dangle so you can decorate later.


This is the finished book. I will be decorating this later using acrylics and maybe some Folk Art designs. I will let you know how I go and share some pages with you.

You may use any colour on your backgrounds depending on what you wish to paint in your book or you may wish to use mixed media, collage, scrapbook or journaling!
If you keep to a simple colour scheme all the pages will complement each other especially if you have used different size cards as I have used. Hope you have Fun.


Monday, December 29, 2014

Wishing everyone a great 2015


Just look at these lovely azalea's, with all the rain we have had we had a full cover of flowers  about 2 months ago. They are south facing, against a wall. This plant catches the morning sun, it is the only spot in our garden that we can grow azaleas. The lower two photograph shows two grass parrots that I found on our doorstep in Sawtell caravan park, they stayed around for a while and as I was feeding them they came right up to me and fed from my hand.


I hope everyone had a lovely Christmas and I hope the new year to bring you some peace within, God bless. Lyn.

In the new year I will be joining a workshop with Kate Bolton, we will be learning new techniques as well as painting a lovely painting, we have 3 paintings to choose from, i will be painting gum trees. I will let you know how i go!


Monday, September 8, 2014

Mountains and Rivers Painters

Slip over to www.mountainsandriversfdp.blogspot.com  For details of a painting competition!

Saturday, August 30, 2014

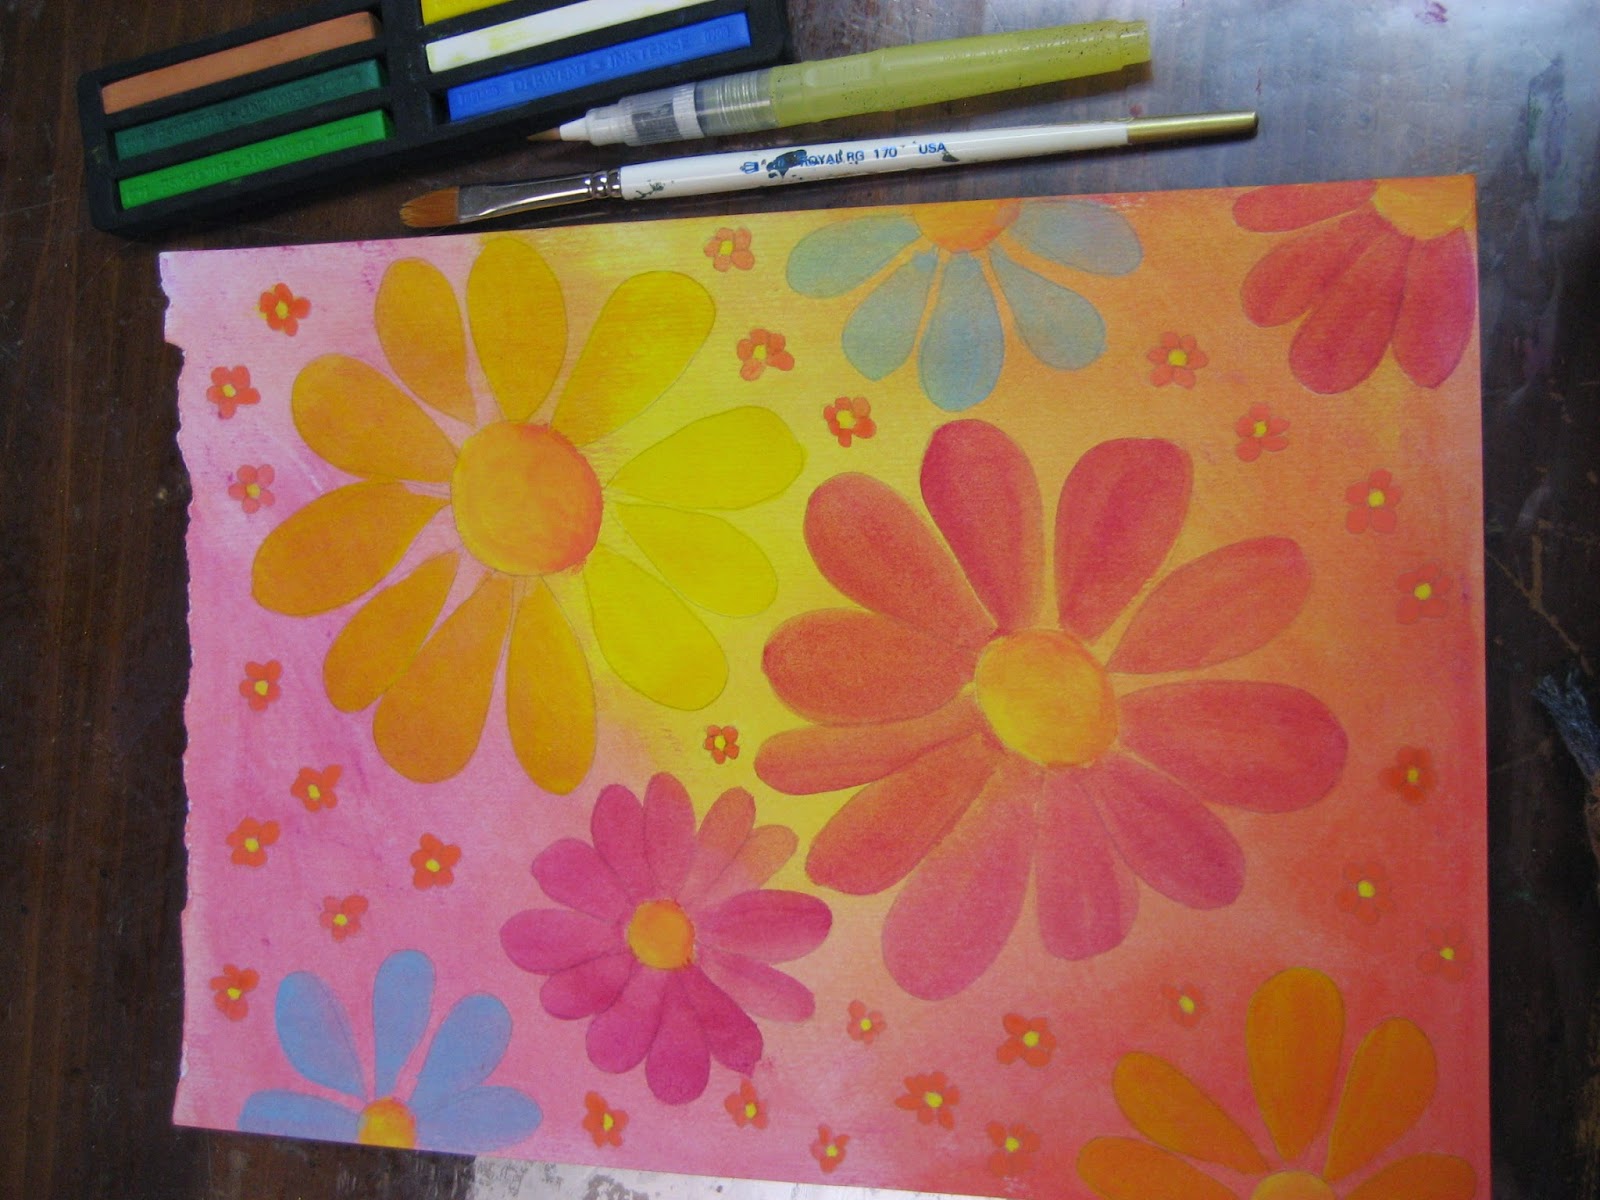
Using Inktence blocks and Matisse paints.

Just finished this project using Inktence blocks (these are like the Inktence water colour pencils) and some Matisse paint. You can also see in the photo a water brush and a filbert brush.

I first used 3 colours from my few Inktence blocks and rubbed them across the dry A4 watercolour page, placing the colours where i  wanted them, covering all the paper. Next i took a baby wipe and starting with the lighter colour first i wiped the colour over, blending in the colours with a circular motion. Do not rub too hard or you will rub off all the colour.  When i was happy with the result i let it dry naturally. Then i lightly drew on the flowers with a pencil.

Please note that the pencil lines can not be rubbed out very well.


Next I used a filbert brush and using watery Matisse paints i painted in the large flowers. The small flowers were painted by using the water brush and the Inktence blocks.

The water brush is a brush with a water chamber and works well with watercolours, the brush reminds me of the old fashioned ink pens!

Again dry well.


Next i added some black outlines to make the flowers pop.


 Using a white pigment pen, (bought from Officeworks) I dotted all over the background. This pen is also good for writing over your art journal.


Next I added some stickles, by Ranger, it has a very thin funnel and makes applying it much easier. Matisse make a good range too.

                                                     
                                                          This is the finished piece; Just have fun, Lyn.


Monday, August 18, 2014

Hello in August

It is now late August and I am trying out my new computer, my old one was very noisy and slow! so hi to everyone! and hopefully I can give more time to my paintings and my blog. I have not been idle, just sick and it has not helped my Chronic fatigue syndrome at all,  I have found energy to do a little work in my art journal with Inktence pencils and sticks, they are easy to set up than paints, along with some projects with Mountains and Rivers group, they have a weekend away in October, or you can attend a workshop on the Saturday or Sunday if you wish. We have six workshops with six lovely projects to choose from. Click to see the blog 

As soon as I get this computer up and going I will show some more paintings, at least now i can make sure that i add more blog posts on a regular pace, hope you are all still looking. We are also having a compertition with Mountains and Rivers group so check back later to their blog to find more info.

Talk again soon, thanks for using my blog! Lyn.

Wednesday, May 14, 2014

New painting

This folk art pattern is from a collection by Denise Shulik, and at the Mountains and Rivers meeting on Saturday Denise taught this piece to twenty four ladies, It was a light piece to paint achievable in the 3-4 hours that we have at the meeting. See Mountains and Rivers blog to see what is happening within the painting group. www.mountainsandriversfdp.blogspot.com


The painting below is painted by me, I painted this on a canvas 35cm x 45cm. 


Ladies and Gents, have Fun, Learn to Paint!

Monday, November 18, 2013

Tis the season, well not quite...........

Tis the season to be gathering all those un-finished, un-painted Christmas projects ready to put on display in a couple of weeks time.

Among my little treasures I found some cut out Santa,s on of my students cut out for the class a long time ago. They are rocking santa's, that is they stand up and if you pull them to one side, gently, they will rock from side to side for a few moves, without falling over.

I painted 7 of these little fella's, all in red, it was not until I had finished that I thought i could have painted some of these in brighter colours, they look good all the same. if you are interested they are for sale on my Made it store or Etsy store, links to both sites are on the right hand side of this post.

As we do not have the resources to have more of these little Santa cut out, these are the last I have.

The original Design is from; an American book called; Country Lovin, warm 'N Cozy, by Pat McClure. It  was published in 1990, by Viking Folk Art.


Me pulling  Santa to one side ready to make him rock.
This one is the small size, there are two larger one's.
A close up of one of the faces.


Tuesday, October 22, 2013

Smash Art Book

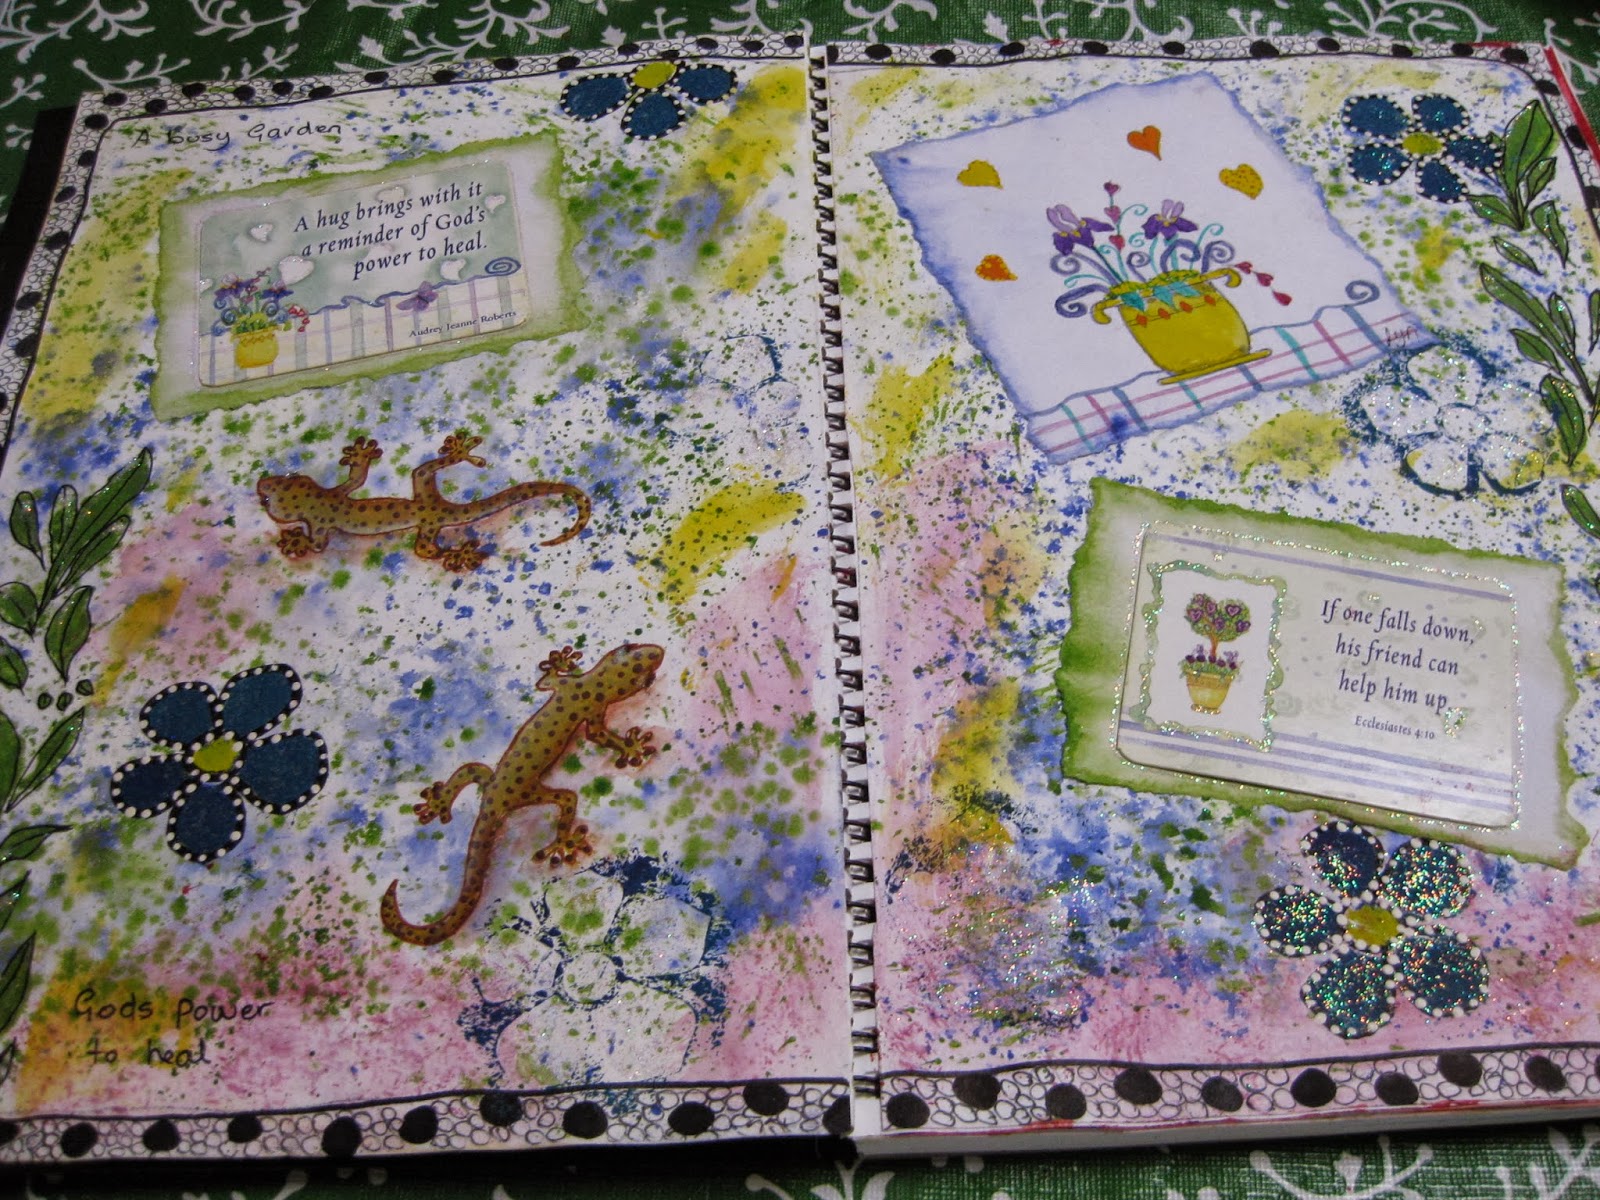
As promised I am now showing some of my pages from my Smash Art book. I have been working in this book in between my Folk art Painting. I find it more creative as I paint what I feel, and it also gives me samples and ideas to look back on. Sometime a simple idea can lead to a folk art design.

Smash books are a way for everyone, even if you have no experience in this type of craft or art, you can still use it to express how you are feeling at the time, it does not have to be painted, craft items are often included into smash books. Some books or pages can be very personal to the person creating them and may never be shown, a form of therapy, If you use acid free products you could also use it as a photo album or journal,  there are plenty of other examples of how to video's on the internet to help you get started.


I started with a basic art book from the local VH dollar shop, cost was $5.50. Taking a piece of watercolour paper (140g) slightly smaller than the front cover, (which is plastic by the way). I taped down the paper to a board while I worked on the pattern. Using a permanent black texture pen (also from the dollar shop) I drew in the horizontal wavy  lines and did a bit of doodling between them, the bottom half I used a stencil and drew through the holes in the stencil, moving it around as I worked. Then I coloured it with water colours, let it dry and glued it to the plastic cover with PVA glue. Make sure that the edges are stuck down.

These two postcards are from a lady  I bought a purse from on Etsy, Bo, sent me these as a little surprise in my parcel. I was not sure what to do with them, as I really liked them I decided to add them to my smash book, with a bit of watercolour, doodling and some writing, it did not need anything else. This is where it can start to get personal and I like the way it is proceeding, either arty or as a visual diary. Smash books are about layering, but I like things more simple, cleaner looking, I enjoy that. How you journal is up to you!

This one is more about layering, as full as a garden can get, it was inspired by the two spiritual cards, I had for ages, with a little bit of layering using stamps, splattering, stenciling and some painting this page emerged. 


Work is ongoing and I intend to keep going with this type of work as well as with Folk Art.
Next Sunday I am attending a workshop with the Mountains and Rivers, looking forward to that and I have a teacher that I have not worked with before so it should be fun! Photo's later. Enjoy!


Friday, May 31, 2013

Latest painting, Mixed media.

Hi Everyone!

Had nearly a week to get over my weekend away at Nelson Bay with the ladies from Mountains and Rivers. Great weekend, the painting was A1 as usual, for the first time at this convention I taught a class, my Owls were one of the painting choices on the Friday afternoon, it went well with seven students, we seemed to be laughing a lot I was told by the other classes, we did have a good time all weekend.

Saturday I chose a mixed media painting by Josephine Louwen, Josephine is one of our Mountains and Rivers Folk Art teachers, an excellent teacher with many years experience.


This "Zentangle" is painted by me from a design by Josephine Louwen.

Josephine can be contacted through Mountains and Rivers.


Since painting this I have looked into the pen work on the circle. Some call it "Zentangle" others doodling. Doodling - meaning is; Doodling - present participle of doo-dle (verb) = 1.    Scribble absentmindedly.

If you Google search ' doodle you find that the work is often drawn absentmindedly with no real form, often filling the page. 

While searching "Zentangle" they start by drawing what they call a 'string' and forming a shape with this drawn 'string they then draw a selection of patterns inside this 'string'

"Zentangle" is a trade mark of an internet company that sell books and patterns.

In the last couple of days I have trying out some dooling/tangling (what ever you would like to call it) of my own, it is quite easy to do, and it grows on you!


This one I drew around the bottom of a Horlicks container, it was oval. I then drew shapes inside the oval and decorated them, I then went outside the oval and drew some more shapes until I was happy with the design. When I looked back I can see a bird with it's head tucked away, I had no intention of drawing anything, just a as my mind took me. Not bad for a first attempt.


This second one I was tired so the shapes not so good, I was trying to resemble the comers in Folk Art, just goes to show it is best not to think too much when drawing these, it is best left quite spontaneous.

I drew this one the next night, must have had too much chicken! that is what it reminds me of!

These by the way were drawn on lined paper out of an exercise book with a double sided "sharpie" pen. The trouble I had is that the pen bleed through to the next page, so either put a piece of card under the page or better still draw on a sketch book or some thicker paper. Look out for some mixed media paintings using some tangles within the painting. Do try it and Have fun!

Tuesday, April 23, 2013

Retirement, but not for this blog.

It is with sad news that I announced that our free Thursday group has now closed. We are going to get together for Lunch or morning teas from time to time as the friendships with these ladies have been very special and they are worth a lifetime friendship's. Thank you ladies for the last 6 years of sharing painting and friendships within the lovely setting of the Fairfield Museum and Gallery. I have been teaching thirteen years, since 2000 and it is time to have a rest. I do hope that you continue to paint, I know I will and will continue to post my paintings on my blog, with much love, Lyn.

Due to my health I have to let some things go and rest more. My body has been telling me that my  ME/CFS has been stirred, there are no more days where I feel good, i have a lot of pain of late, if i went on much longer like this it would lead to a relapse.

I will still continue this Blog as I need to keep some things going in my life, as well as I can enjoy sharing my work with you all, so drop in often as hopefully I can share with you more often than I have been doing.

I will also continue with the Mountains and Rivers Folk and Decorative Painters group as the meet only five times a year. Also I will continue to be the Publicity officer as most of this work can be done on the computer. I also run a blog for Mountains and Rivers, check it out; www.mountainsandriversfdp.blogspot.com


Sunday, April 14, 2013

Inktence Pencils.

More of my bookmarks, these are very easy to make and very relaxing. I drew the first designs on some paper , I found them easy to draw so instead of transferring them onto the bookmarks I drew the design straight onto the card stock using the outliner provided  in the set. The card stock I purchased ready cut out from www.creativecrafts.com.au

They would work on any card stock. Start with the daisy, they are very easy.

Next I used Derwent Inktence pencils. I had bought them ages ago at a craft show and have not used them until now, my intention being that they would be good to carry while on holiday and I could use them to make colour sketches, this of course never happened, but now I know how to use them I quite enjoy the light change and freedom they give you. The pencils would be good for smash books and journals. you can also buy them in stick form, like the pastels.

Method;
First I sprayed the cards with ink, red and purple, wait a few Minuit's and glue the cards together, this gives you added strength for bookmarks. When dry, draw or trace the design onto the card stock.

Then I started to colour in the flowers with the Inktence colour pencil, now with a small watercolour paintbrush, dip this in water and start to paint one area at a time. The water will blend the colour making it a more intense colour. It dries in a few seconds, once dry you can add more pencil and repeat with the water. I have found more information on the net and the following guidelines gives you more idea of how they work. you can also find out more about them on YouTube. Go onto YouTube and type in Inktence pencils.

The outliner will rub out with an eraser. It is also waterproof.
use two or more colour pencils dry to your work, when a small amount of water is used you can blend together these colours.
If you draw onto a wet area with your inktence pencil it will stay there, you will not be able to blend together.
If you want to blend colours or darken colours, say on one petal, add the paler colour first, add water, dry then add the deeper colour, add water to deepen.
Hope this makes sense?
Happy Painting. Lyn.

To explain this try reading this;
http://robertsloan2.hubpages.com/hub/Secrets-for-Using-Derwent-Inktense-Colored-Pencils

Saturday, April 6, 2013

Hand painted bookmarks

Today I set aside time to paint some bookmarks that I had purchase long ago.........

I sprayed the bookmark/cards with Smooch Spritz, made in USA. I have had these for ages and I am not sure if you can still get them, they are lovely colours. They do not fade and do not smudge when wet. I would love to get some more as I am running out but can not find them at craft shows. So if anyone knows where I can get them from please let me know.

Back to the bookmarks, I then drew on some flowers and wild flowers, using the Inktence pencils by Derwent I painted the design, took me nearly all day (on and off) to paint 6 bookmarks. Well worth the effort as I am pleased with the results. Happy painting!
All these bookmarks are for sale on madeit.com.au/artbylyn

Monday, March 4, 2013

Hello

Hi everyone, time is passing so quickly! It is now March, I have already been to two workshops, one with Kate Belton at the first meeting of the year with Mountains & Rivers at Penrith, painting a lovely wood tile with a kettle and fruit, it came up lovely as Kate is always a professional  teacher, this was in February.

This is my painting; (there is texture paste underneath)


Then only last week I was at a workshop with Christine Whipper, we painted 'Maude'. The background is done with Mattisse inks before painting Maude with Jo Sonja paints. My painting is not yet finished.

The original 'Maude' was painted by Alfons Mucha a talanted Art Nouveau painter in the 1930's.


My painted owls on a canvas bag was entered in the folk art section, Fabric painting, of the Luddernham show last weekend, and would you belive it I recieved First Prize! much to my supprise.


Friday, February 1, 2013

Class news


A photo from one of our Mountanis and Rivers meeting 2012


Our Thursday class will start on the 7th February, I hope everyone had a lovely break and you are eager to start painting again.

I have been busy with my project for the Mountains and Rivers get away in March. No sneek pre-views, all the convention projects will be on display on the mountains and Rivers in a couple of weeks time, so keep checking!

A warm welcome to all my readers, thanks for your support and emails, it is always lovely to hear from you. Looking forward to sharing with you all this year. Kind regards, Lyn.

Sunday, December 16, 2012

Merry Christmas

Wishing you all a Merry Christmas!


To all my Students and Readers. This has been a busy two months, we went on a well needed holiday to Tuncurry staying  in a town house faceing the sea and a cosy B&B that was over a 100 years old.

We were lucky enough to meet the new oners who had just taken over the lovely old cottage and they showed us around it was lovely!


The original owner and builder, built the house for his family, he was a local saw mill owner in the Tuncurry area, He also built the church next door, sad to say though, he just finished the church when he died, so the first service in the church was his funeral. It is nice to know though that the house is still giving pleasure to people who live and stay in the B&B. The 3 town house's built on the same site were built 12 years ago. Two are holiday lets and one is private. The whole site is on a corner near the Tuncurry/ Forster bridge.


We are all due back at painting in the New Year, 2013. On the 31st of January.

See you all then and have a lovely Break and Happy New Year!

Saturday, October 13, 2012

Have been busy..........

Hi all, it is a long time since I posted something on my blog, well this nasty flu bug is still giving me problems, still on the sprays, like so many other people that I have spoken to, and with the CFS/ME it just brings on the symptoms of Fatigue. Rest, rest and more rest.

I have not done much painting for the last few months, however, I have finished off the painting I did with Christine Whipper, it still has to have some varnish and a hanger on it, looking good! I have to take a photo of it in the next couple of days to show you.

Also from a couple of years ago I bought a Advent Calender kit, it has sat in the spare room for all this time, now my grandchildren are growing up I have started to decorate it with papers left over from my scrap booking days. I must say it was a lot easier cutting and gluing the papers than painting all those pieces, as well as the problems of painting them only to find that the craft wood has swelled when painted so lots of sanding would have been needed.
The craft wood covered quite smoothly with the paper, it looks good too. When it is completely finished I will post the photo and how I covered it. Worth the effort for my Grandchildren and I enjoyed the process, just that it took so long as everything was flat packed, and no real instructions! Not something I would do again in a hurry.

I have also been helping a friend paint two very heavy (but sturdy) old posters she has in her kitchen. They are looking good with a fresh coat of paint and a different look, we spent a few hours yesterday working on one of them with much improvement. Too big and heavy to bring to class so we are painting them on site.
Be back soon with photo's of all projects, Lyn.

Sunday, August 26, 2012

My latest workshop as a student.


As you can see this is part of a project by Christine Whipper, the original painting was 30" x 40" painted in the Chinese design. I only painted part of the design in the workshop on a smaller canvas and intend to paint the full piece over the next few weeks as I think it would look awesome on the wall over the bed. This is part of the flower, painted by Chris.


This photo is driving me crazy! I can not get it the right way up!!!!!!!!!!

My painting on the day of the workshop, part of the design. The background is interesting and easy to achieve. I will publish my finished piece when it is finished, so you can see all the design.


Christine showing us a demonstration on the day.

Christine can be contacted via Tin Kat Alley, Tinkat Alley Art Studio is only one hour north of the Pymble exit to the Newcastle Sydney freeway.

Tinkat Alley Art Studio


57 Haddon Crescent

Marks Point

NSW 2280

Australia, (02) 4945 1823

Some of Christine's latest workshops can be seen on line at tinkatalley
Enjoy! Lyn.